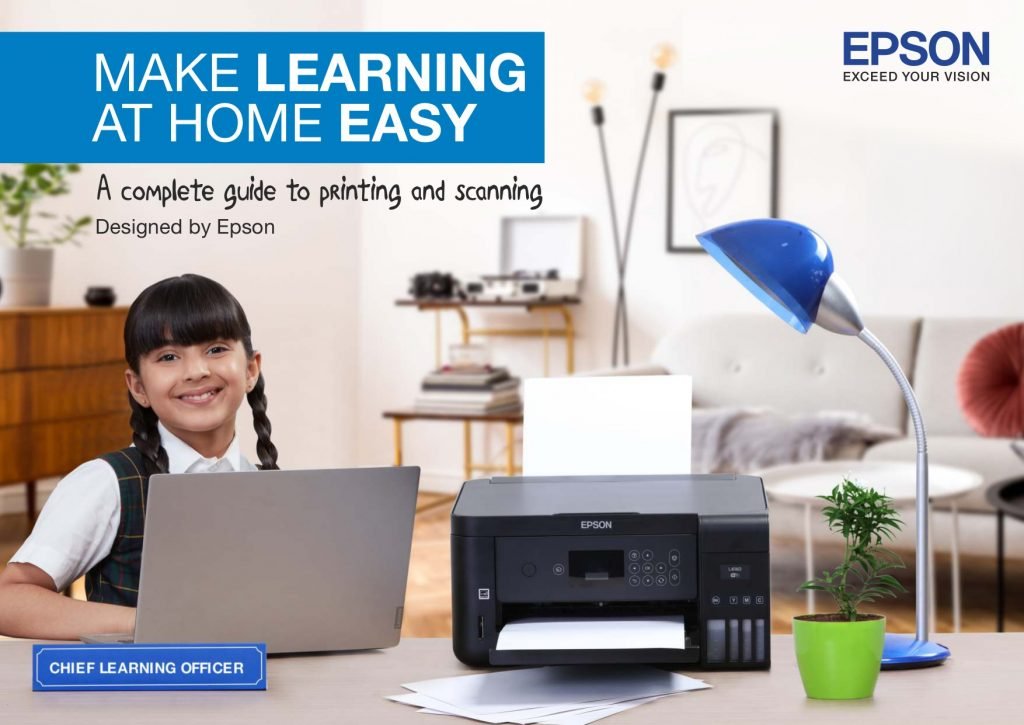
MAKE LEARNING
AT HOME EASY
Designed by Epson
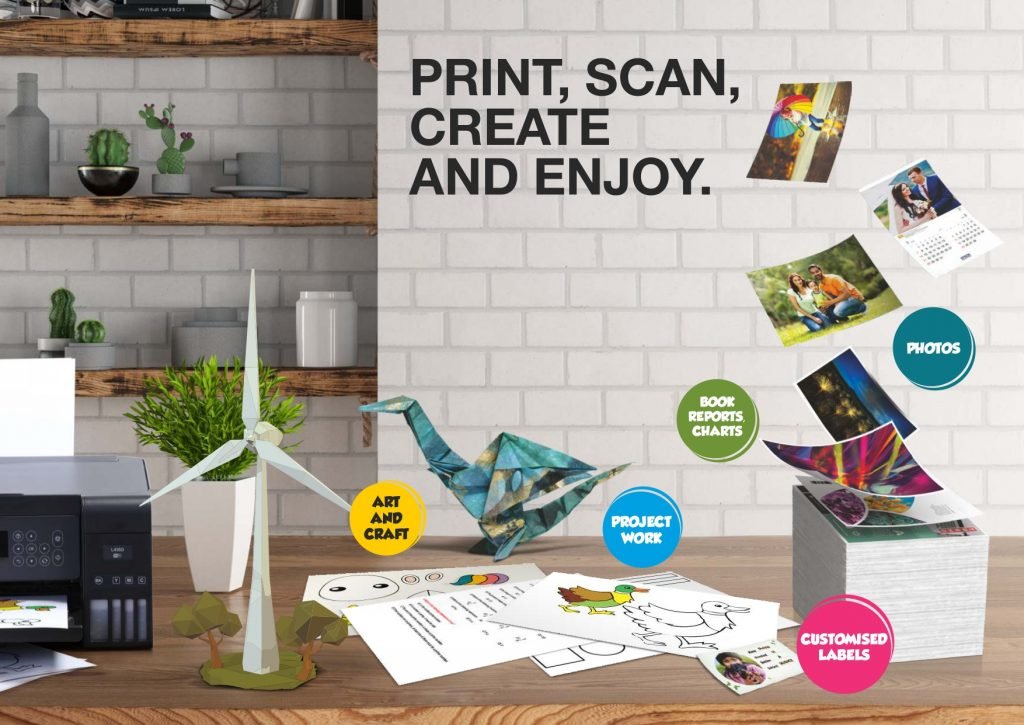
PRINT, SCAN,
CREATE
AND ENJOY.
PHOTOS
ART
AND
CRAFT
PROJECT
WORK
CUSTOMISED
LABELS
BOOK
REPORTS,
CHARTS
BASIC INFORMATION
PRINTER PARTS AND
THEIR FUNCTIONS
Rear paper feed – Loads paper. 1.
Paper support – Supports loaded paper. 2.
Edge guides – Feeds the paper straight into the printer.
Slide to the edges of the paper. 3.
Feeder guard – Prevents foreign substance from
entering the printer. It’s important keep this guard closed. 4.
Output tray – Holds the ejected paper. 5.
Document cover –
Blocks external light
while scanning.
1.
Scanner glass –
Place the originals here. 2.
Control panel – Allows you to operate the printer
and indicates the printer’s status. 3.
Front cover – Open when removing paper
that’s jammed inside the printer. 1.
Ink reservoir tank (ink tank) –
Supplies ink to the print head. 2.
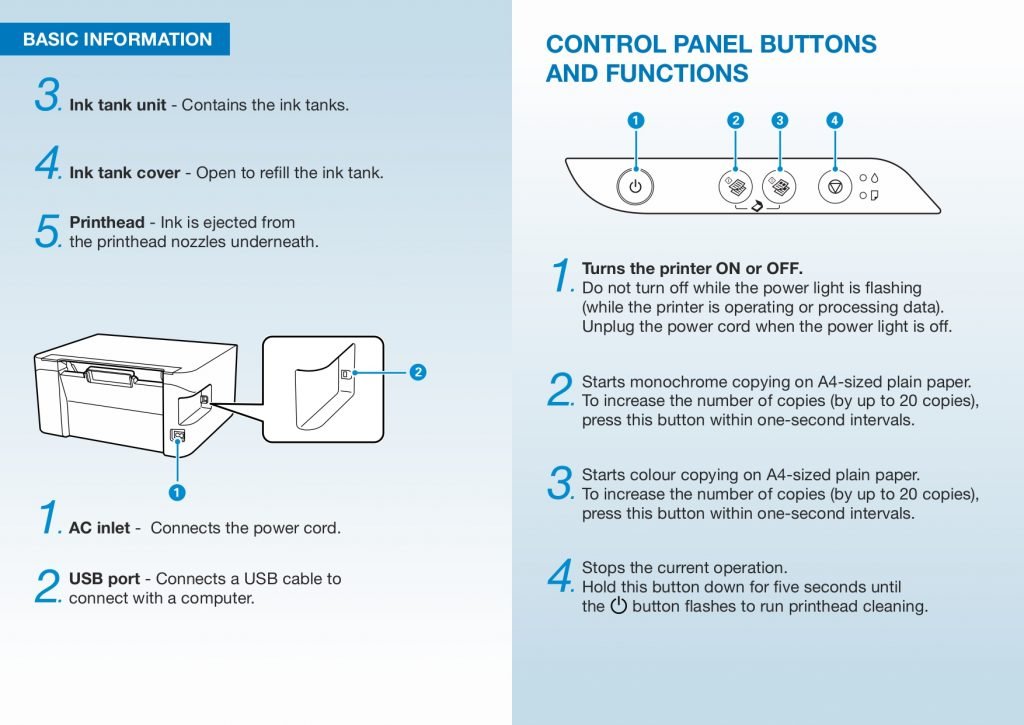
Ink tank unit – Contains the ink tanks. 3.
Ink tank cover – Open to refill the ink tank. 4.
Printhead – Ink is ejected from
the printhead nozzles underneath. 5.
AC inlet – Connects the power cord. 1.
USB port – Connects a USB cable to
connect with a computer. 2.
Turns the printer ON or OFF.
Do not turn off while the power light is flashing
(while the printer is operating or processing data).
Unplug the power cord when the power light is off.
1.
Starts monochrome copying on A4-sized plain paper.
To increase the number of copies (by up to 20 copies),
press this button within one-second intervals.
2.
CONTROL PANEL BUTTONS
AND FUNCTIONS
Starts colour copying on A4-sized plain paper.
To increase the number of copies (by up to 20 copies),
press this button within one-second intervals.
3.
Stops the current operation.
Hold this button down for five seconds until
the button flashes to run printhead cleaning.
4.
BASIC INFORMATION
GETTING STARTED
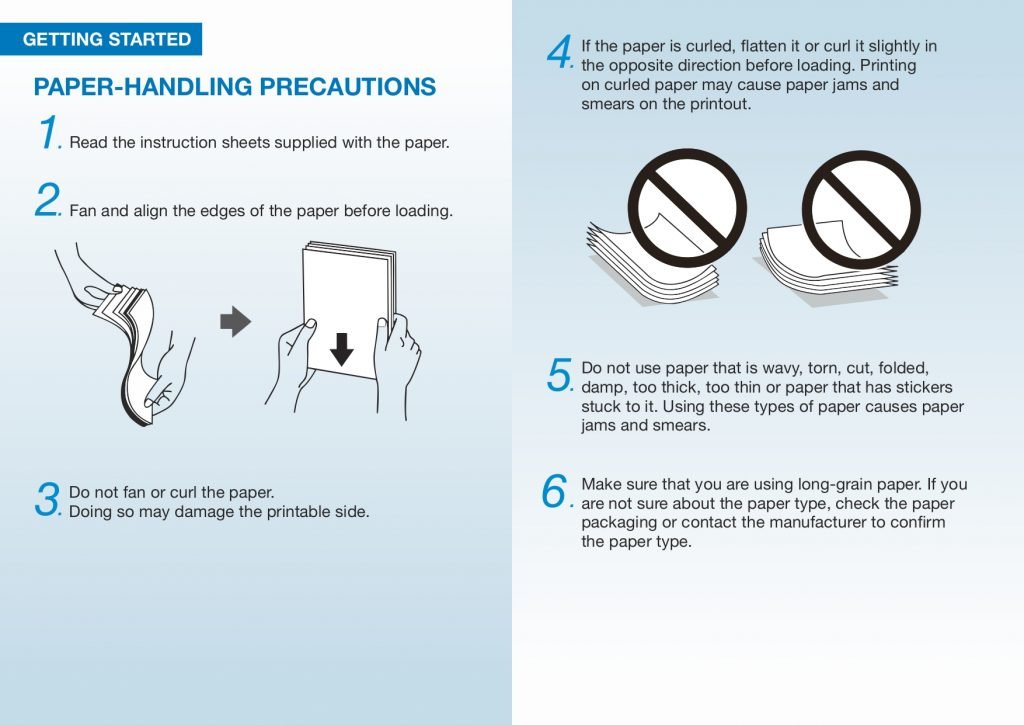
Do not use paper that is wavy, torn, cut, folded,
damp, too thick, too thin or paper that has stickers
stuck to it. Using these types of paper causes paper
jams and smears.
5.
Make sure that you are using long-grain paper. If you
are not sure about the paper type, check the paper
packaging or contact the manufacturer to confirm
the paper type.
6.
If the paper is curled, flatten it or curl it slightly in
the opposite direction before loading. Printing
on curled paper may cause paper jams and
smears on the printout.
4.
PAPER-HANDLING PRECAUTIONS
Read the instruction sheets supplied with the paper. 1.
Fan and align the edges of the paper before loading. 2.
Do not fan or curl the paper.
Doing so may damage the printable side. 3.
GETTING STARTED
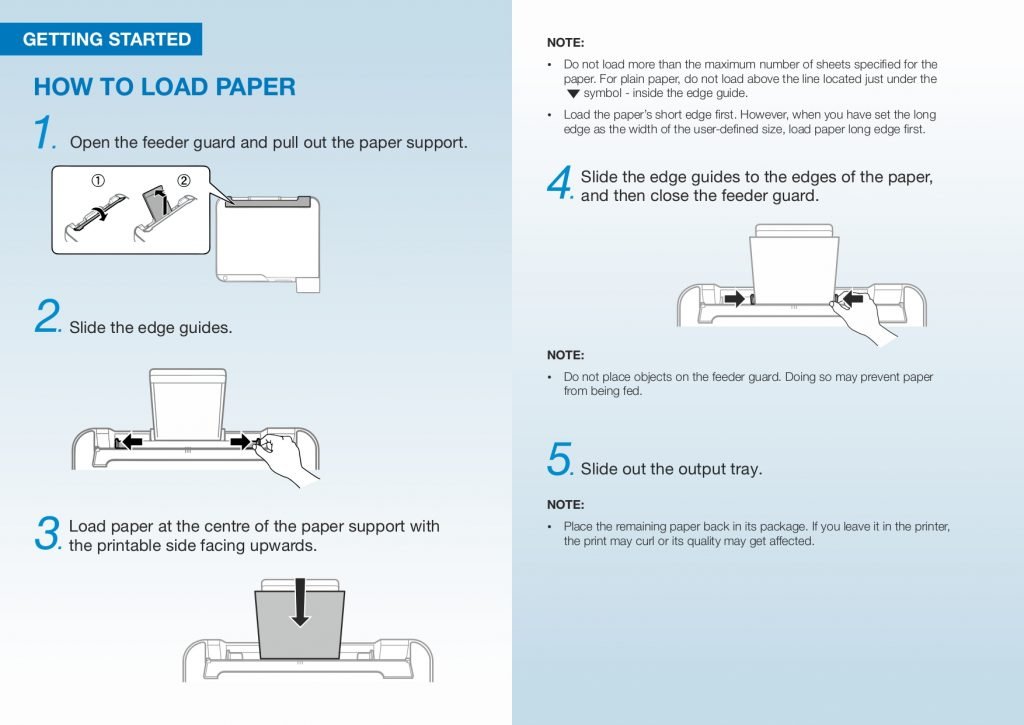
HOW TO LOAD PAPER
Open the feeder guard and pull out the paper support. 1.
Slide the edge guides. 2.
Load paper at the centre of the paper support with
the printable side facing upwards. 3.
Ÿ Do not load more than the maximum number of sheets specified for the
paper. For plain paper, do not load above the line located just under the
symbol – inside the edge guide.
Ÿ Load the paper’s short edge first. However, when you have set the long
edge as the width of the user-defined size, load paper long edge first.
NOTE:
Slide the edge guides to the edges of the paper,
and then close the feeder guard. 4.
Slide out the output tray. 5.
NOTE:
Ÿ Do not place objects on the feeder guard. Doing so may prevent paper
from being fed.
Ÿ Place the remaining paper back in its package. If you leave it in the printer,
the print may curl or its quality may get affected.
NOTE:
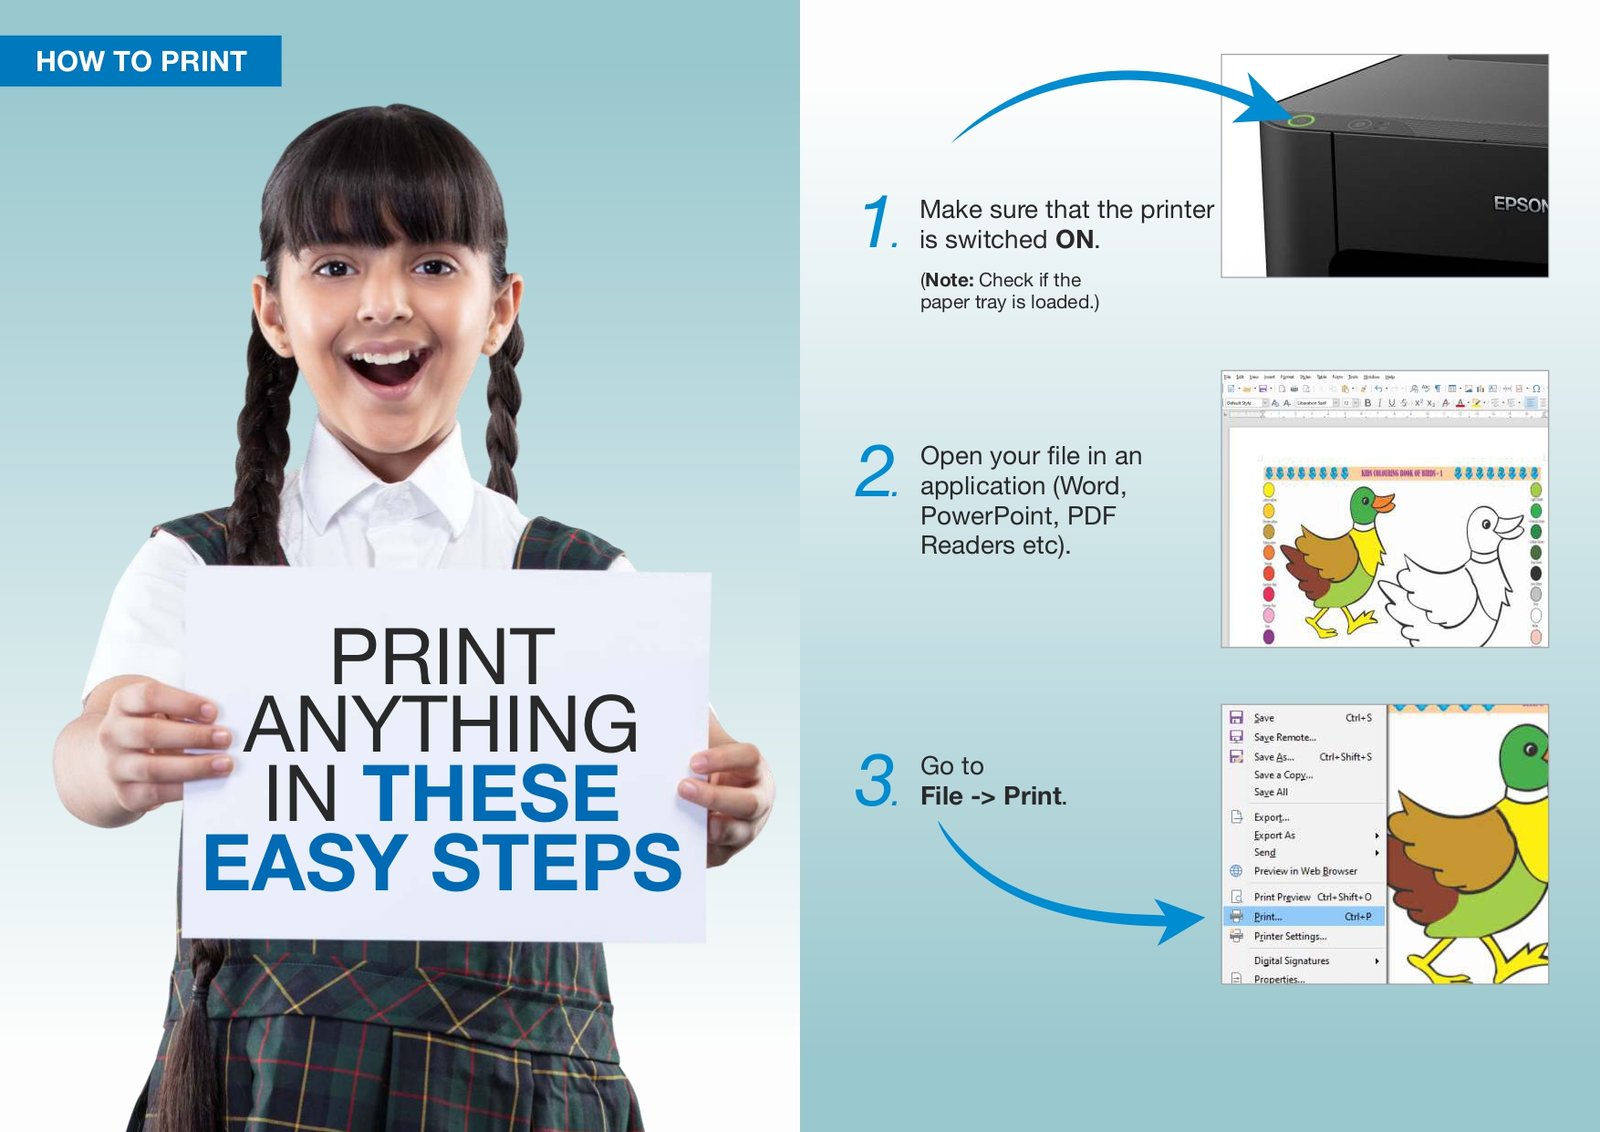
Make sure that the printer
is switched ON.
Go to
File -> Print.
PRINT
ANYTHING
IN THESE
EASY STEPS
HOW TO PRINT
(Note: Check if the
paper tray is loaded.)
1.
3.
Open your file in an
application (Word,
PowerPoint, PDF
Readers etc).
2.
HOW TO PRINT
Select your printer
and select
Printer Properties.
4.
Select the
Document Size. 5.
Now, select the Orientation.
Portrait
A4
Landscape A4
NOTE:
Ÿ A4 is the most widely used format for printing.
6.
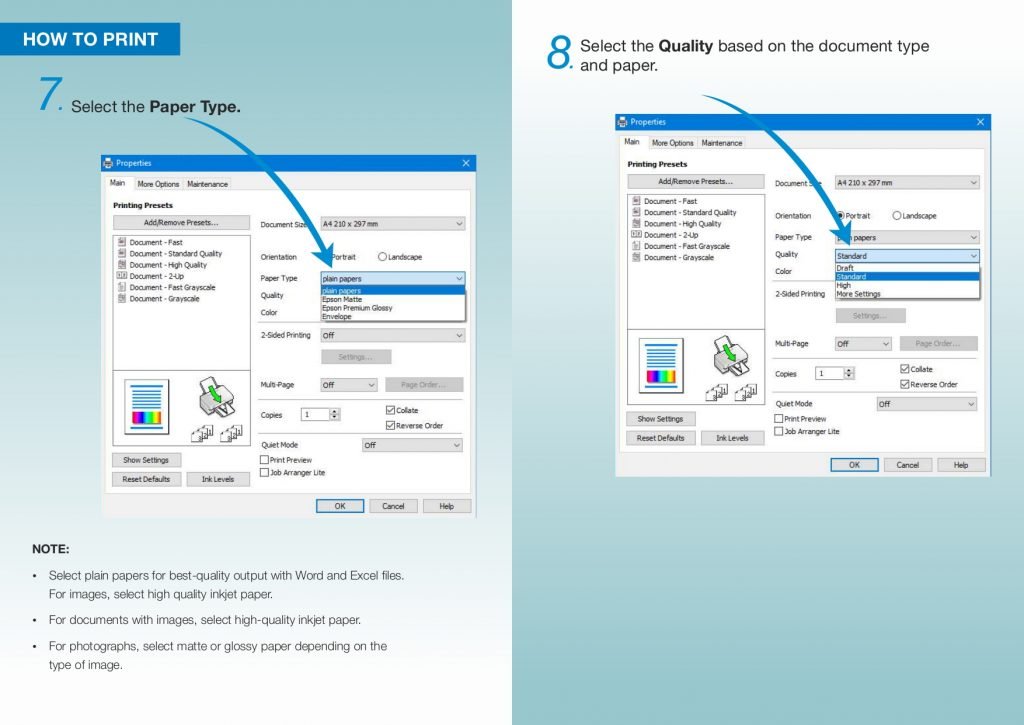
Select the Quality based on the document type
and paper.
HOW TO PRINT 8.
Select the Paper Type. 7.
NOTE:
Ÿ For photographs, select matte or glossy paper depending on the
type of image.
Ÿ For documents with images, select high-quality inkjet paper.
Ÿ Select plain papers for best-quality output with Word and Excel files.
For images, select high quality inkjet paper.
HOW TO PRINT
To print on both sides of the paper,
select 2-Sided Printing. 9.
To enable EPSON Status Monitor 3, click Extended
Settings on the Maintenance tab.
Select Enable EPSON Status Monitor 3.
Click Print.
On the printer driver’s Main tab, select an option
from 2-sided Printing.
Click Settings, make the appropriate settings
and then click OK.
To print a folded booklet, select Booklet.
PRINTING ON BOTH SIDES
OF THE PAPER
You can print on both sides of the paper.
You can also create a booklet by re-ordering the
pages and folding the printout.
Ÿ Depending on the paper and the data, ink may bleed through to the
other side of the paper.
NOTE:
Ÿ Flip the paper over to print on the other side when the printer has
finished printing the first side.
Ÿ If you do not use paper that is ideal for 2-sided printing, the print
quality may get affected and paper jams may occur.
Ÿ This feature is not available for borderless printing.
Print settings
2-sided printing is available when EPSON Status
Monitor 3 is enabled.
When the first side has finished printing, a pop-up window is
displayed on the computer. Follow the on-screen instructions.
HOW TO PRINT
To print two or four pages of data in one sheet,
select 2-Up or 4-Up as the Multi-Page setting. 10.
2-Up
4-Up
HOW TO PRINT
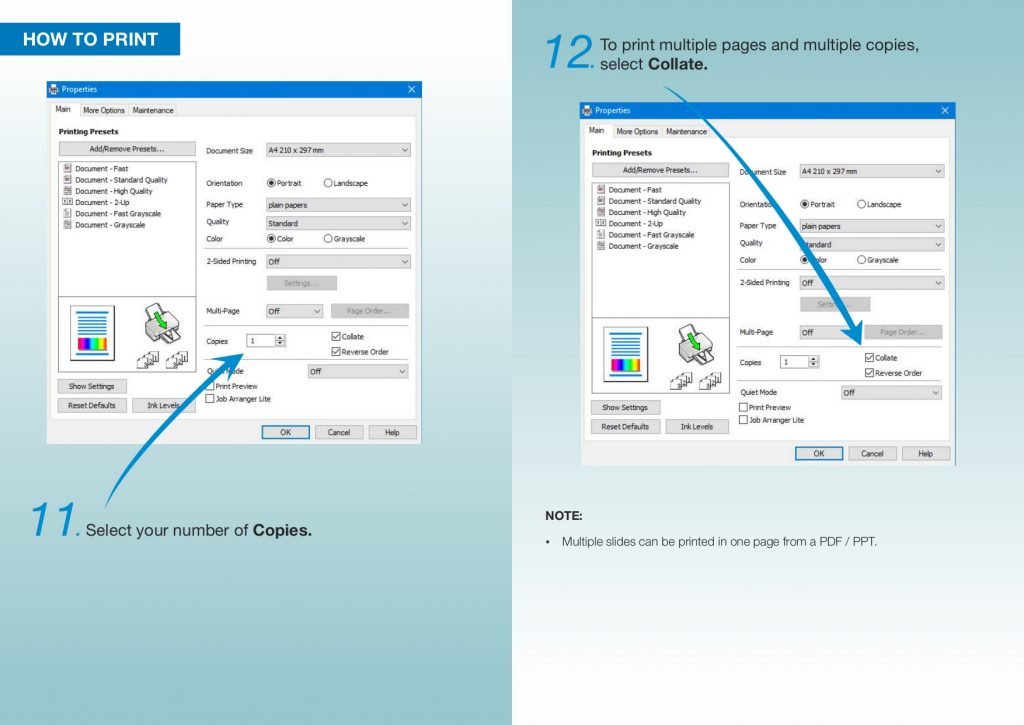
Select your number of Copies. 11.
To print multiple pages and multiple copies,
select Collate. 12.
NOTE:
Ÿ Multiple slides can be printed in one page from a PDF / PPT.
HOW TO PRINT
Then click Print.
To see how your printout looks,
select Print Preview. 13.
ADVANCED PRINTING
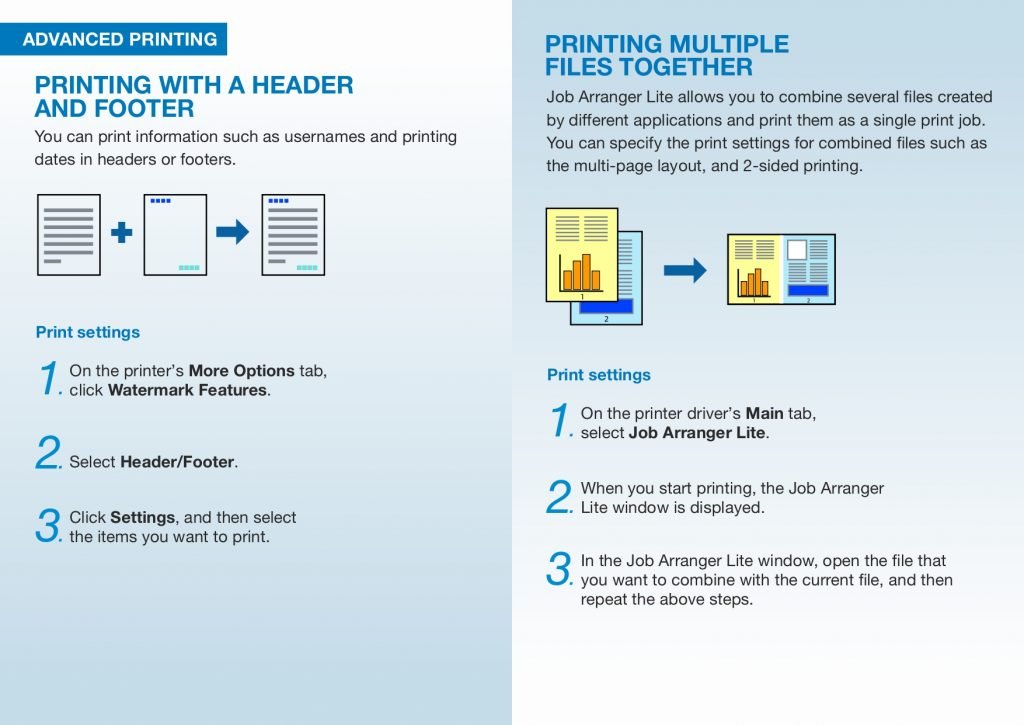
PRINTING WITH A HEADER
AND FOOTER
You can print information such as usernames and printing
dates in headers or footers.
Print settings
On the printer’s More Options tab,
click Watermark Features. 1.
Select Header/Footer. 2.
Click Settings, and then select
the items you want to print. 3.
PRINTING MULTIPLE
FILES TOGETHER
Job Arranger Lite allows you to combine several files created
by different applications and print them as a single print job.
You can specify the print settings for combined files such as
the multi-page layout, and 2-sided printing.
Print settings
On the printer driver’s Main tab,
select Job Arranger Lite. 1.
When you start printing, the Job Arranger
Lite window is displayed. 2.
In the Job Arranger Lite window, open the file that
you want to combine with the current file, and then
repeat the above steps.
3.
ADVANCED PRINTING
Ÿ If you close the Job Arrange Lite window before adding all the print
data to the Print Project, the print job you are currently working on
is cancelled.
Ÿ Click Save from the File menu to save the current job.
The extension of the saved files is ‘ecl’.
Ÿ To open a Print Project, click Job Arrange Lite on the printer
driver’s Maintenance tab to open the Job Arranger Lite window.
Next, select Open from the File menu to select the file.
NOTE:
When you select a print job added to Print Project in the
Job Arranger Lite window, you can edit the page layout. 4.
Click Print from the File menu to start printing.
HOW TO CANCEL A PRINT
You can cancel a print job from the computer. However
you cannot cancel a print job from the computer once it
has been completely sent to the printer. In this case,
cancel the print job by using the printer’s control panel.
Cancelling
On your computer, right-click your printer
under Devices and Printers, Printer,
or under Printers and Faxes.
1.
Click See what’s printing. 2.
Right-click the job you want to cancel,
and select Cancel. 3.
SMARTPHONES
Ethernet WiFi
Print via
DESKTOPS LAPTOPS
PRINT FROM MULTIPLE DEVICES
Print via
WiFi OTG Cable
TABLETS
Print via
WiFi OTG Cable
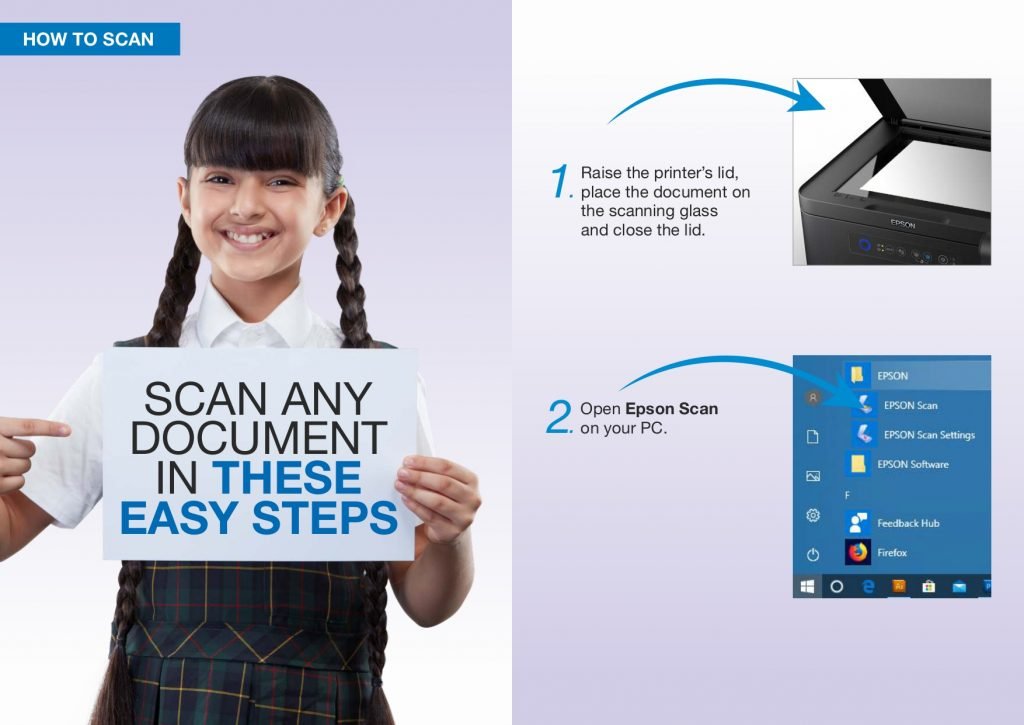
Open Epson Scan
on your PC.
Raise the printer’s lid,
place the document on
the scanning glass
and close the lid.
SCAN ANY
DOCUMENT
IN THESE
EASY STEPS
HOW TO SCAN
2.
1.
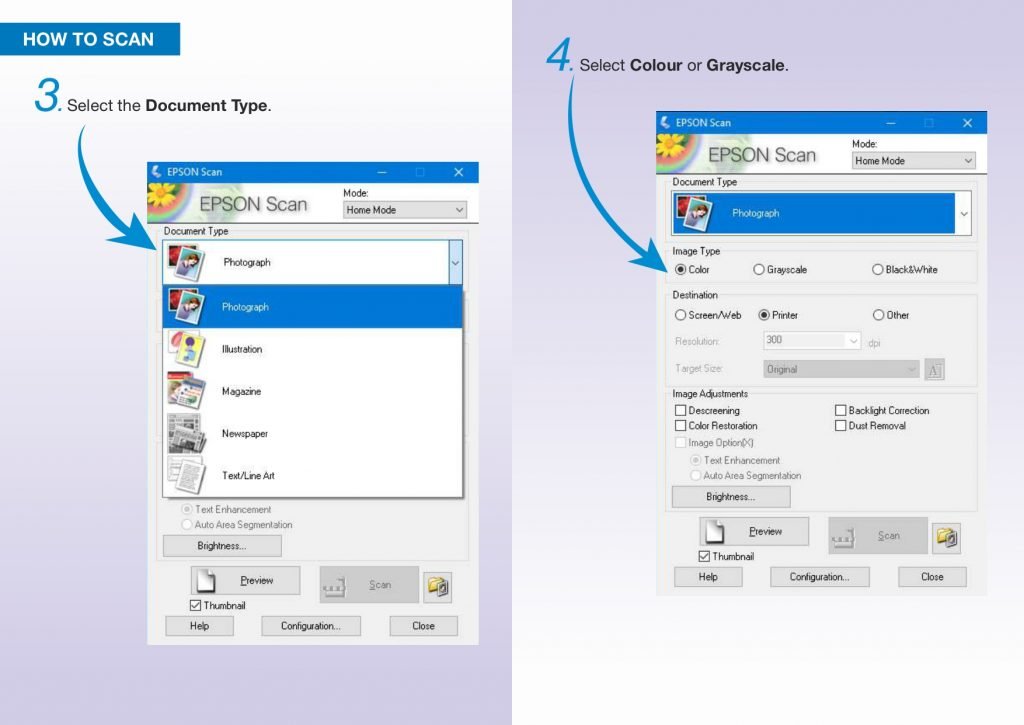
Select the Document Type.
HOW TO SCAN
3.
Select Colour or Grayscale. 4.
Select the Location and the Image Format
followed by clicking OK.
HOW TO SCAN 6.
Click the folder icon. 5.
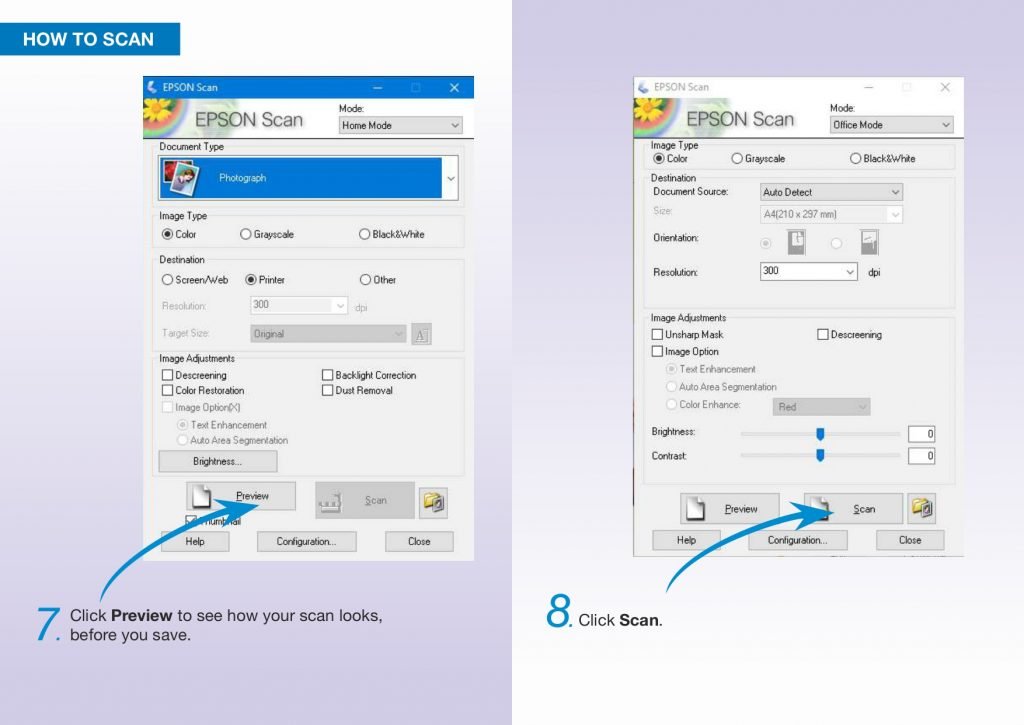
Click Preview to see how your scan looks,
before you save.
HOW TO SCAN
Click Scan. 8.
HOW TO SCAN PHOTOS OR PICTURES
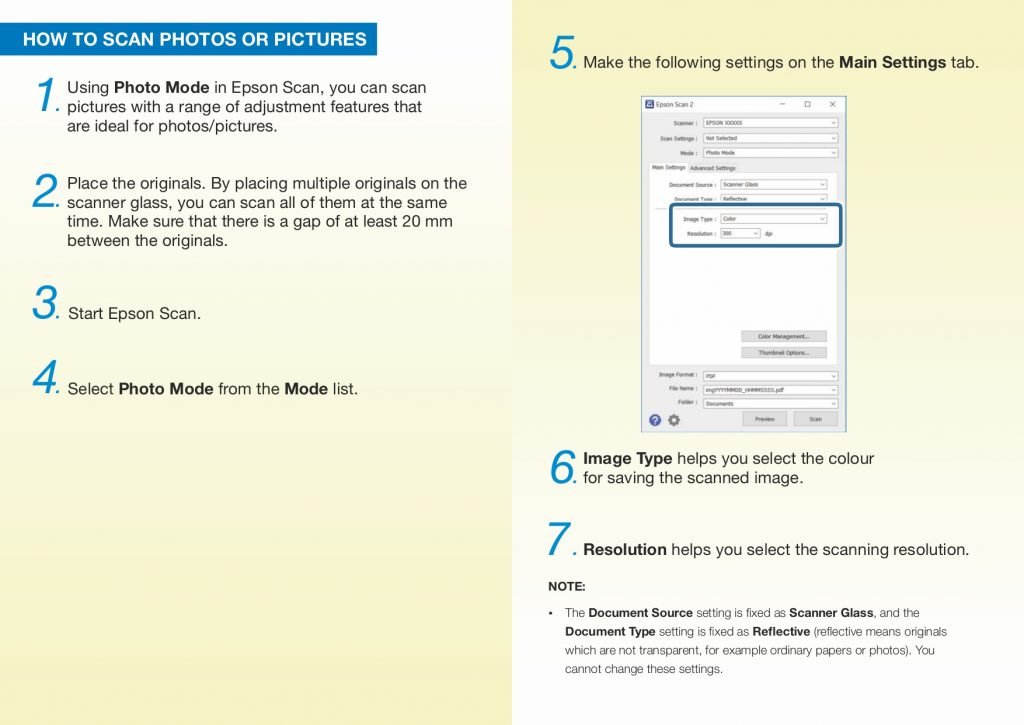
NOTE:
Ÿ The Document Source setting is fixed as Scanner Glass, and the
Document Type setting is fixed as Reflective (reflective means originals
which are not transparent, for example ordinary papers or photos). You
cannot change these settings.
Using Photo Mode in Epson Scan, you can scan
pictures with a range of adjustment features that
are ideal for photos/pictures.
1.
Place the originals. By placing multiple originals on the
scanner glass, you can scan all of them at the same
time. Make sure that there is a gap of at least 20 mm
between the originals.
2.
Start Epson Scan. 3.
Select Photo Mode from the Mode list. 4.
Make the following settings on the Main Settings tab. 5.
Image Type helps you select the colour
for saving the scanned image. 6.
Resolution helps you select the scanning resolution. 7.
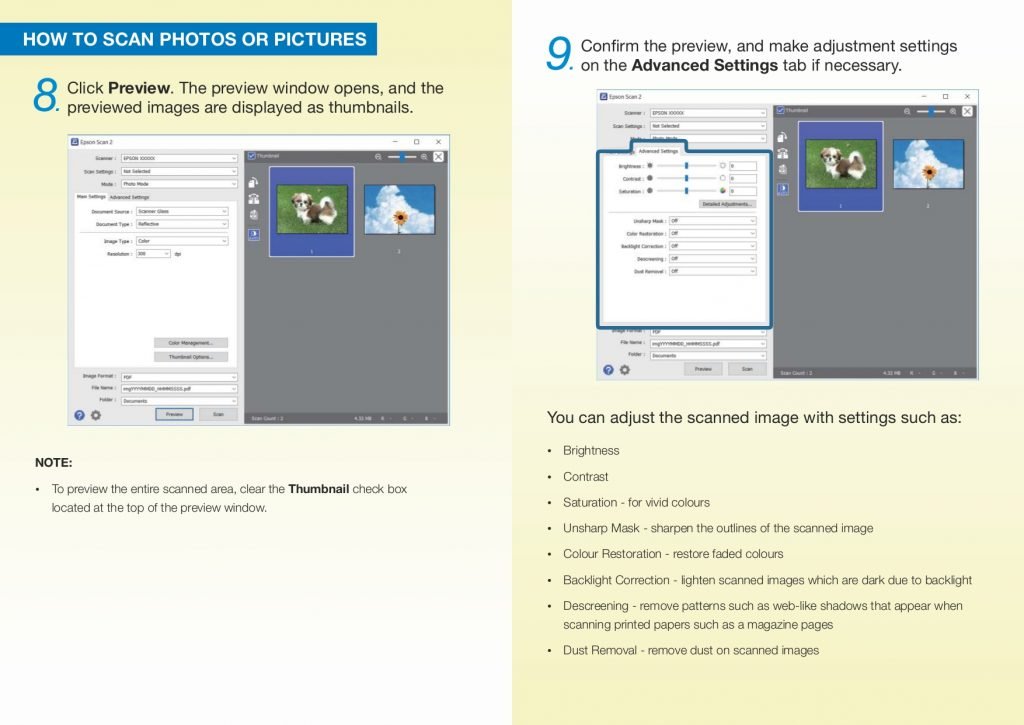
HOW TO SCAN PHOTOS OR PICTURES
Click Preview. The preview window opens, and the
previewed images are displayed as thumbnails. 8.
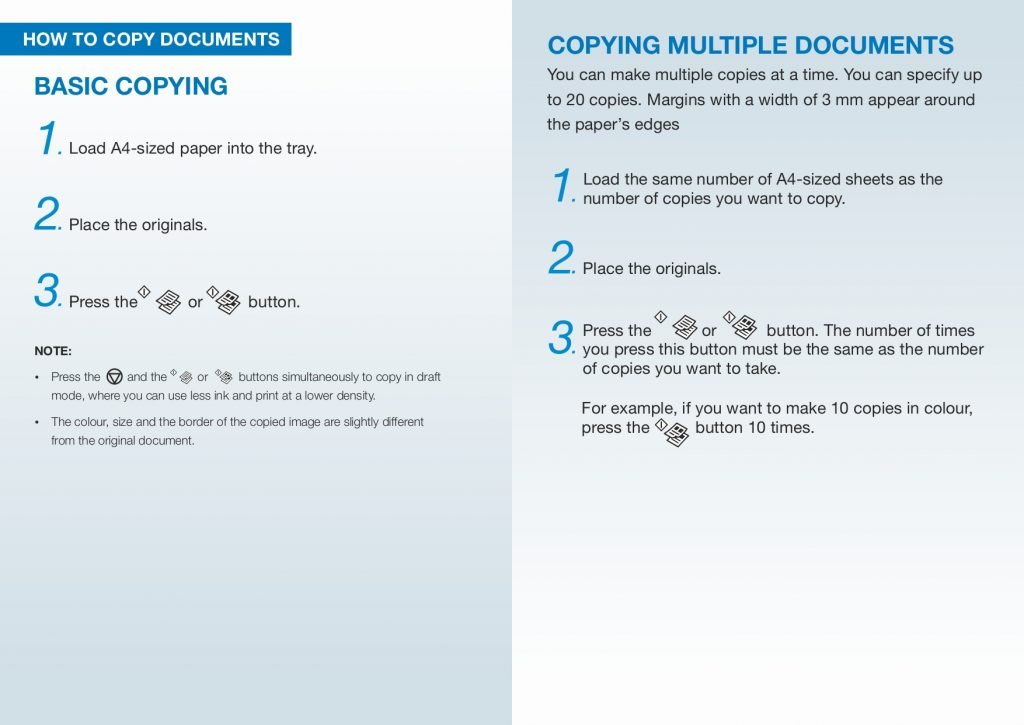
You can adjust the scanned image with settings such as:
Ÿ Saturation – for vivid colours
Ÿ Unsharp Mask – sharpen the outlines of the scanned image
Ÿ Colour Restoration – restore faded colours
Ÿ Contrast
Ÿ Backlight Correction – lighten scanned images which are dark due to backlight
Ÿ Descreening – remove patterns such as web-like shadows that appear when
scanning printed papers such as a magazine pages
Ÿ Dust Removal – remove dust on scanned images
Ÿ Brightness
Ÿ To preview the entire scanned area, clear the Thumbnail check box
located at the top of the preview window.
NOTE:
Confirm the preview, and make adjustment settings
on the Advanced Settings tab if necessary. 9.
HOW TO COPY DOCUMENTS
BASIC COPYING
Load A4-sized paper into the tray. 1.
Place the originals. 2.
Press the or button. 3.
NOTE:
Ÿ The colour, size and the border of the copied image are slightly different
from the original document.
Ÿ Press the and the or buttons simultaneously to copy in draft
mode, where you can use less ink and print at a lower density.
COPYING MULTIPLE DOCUMENTS
You can make multiple copies at a time. You can specify up
to 20 copies. Margins with a width of 3 mm appear around
the paper’s edges
Load the same number of A4-sized sheets as the
number of copies you want to copy. 1.
Place the originals. 2.
Press the or button. The number of times
you press this button must be the same as the number
of copies you want to take.
3.
For example, if you want to make 10 copies in colour,
press the button 10 times.
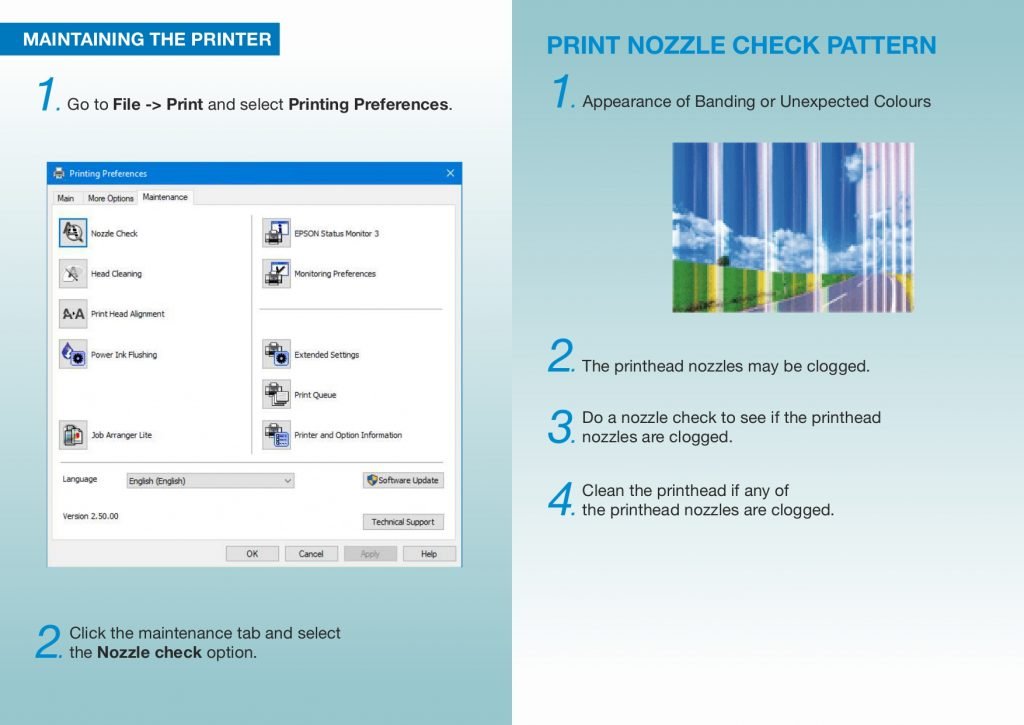
Go to File -> Print and select Printing Preferences.
MAINTAINING THE PRINTER
Click the maintenance tab and select
the Nozzle check option. 2.
PRINT NOZZLE CHECK PATTERN
Appearance of Banding or Unexpected Colours
The printhead nozzles may be clogged. 2.
Do a nozzle check to see if the printhead
nozzles are clogged. 3.
Clean the printhead if any of
the printhead nozzles are clogged. 4.
1.
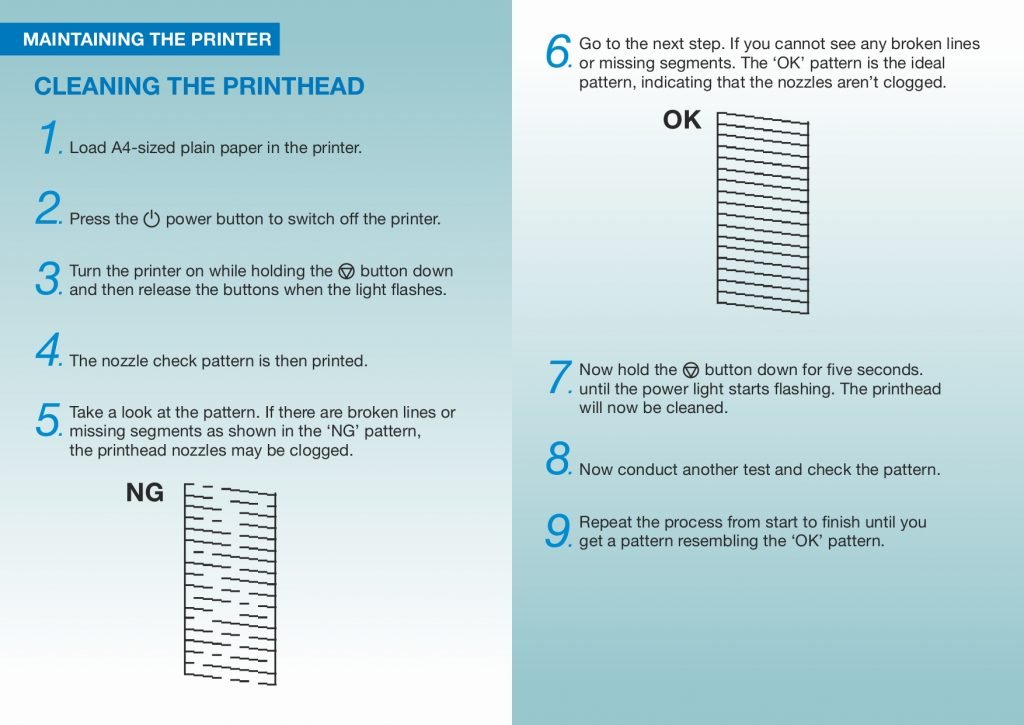
CLEANING THE PRINTHEAD
The nozzle check pattern is then printed. 4.
Take a look at the pattern. If there are broken lines or
missing segments as shown in the ‘NG’ pattern,
the printhead nozzles may be clogged.
5.
Load A4-sized plain paper in the printer. 1.
Press the power button to switch off the printer. 2.
Turn the printer on while holding the button down
and then release the buttons when the light flashes. 3.
NG
MAINTAINING THE PRINTER Go to the next step. If you cannot see any broken lines
or missing segments. The ‘OK’ pattern is the ideal
pattern, indicating that the nozzles aren’t clogged.
6.
Now conduct another test and check the pattern. 8.
Repeat the process from start to finish until you
get a pattern resembling the ‘OK’ pattern. 9.
OK
Now hold the button down for five seconds.
until the power light starts flashing. The printhead
will now be cleaned.
7.
CLEANING THE PAPER PATH
When the printouts are smeared or scuffed,
the roller needs to be cleaned properly.
Repeat the process until the paper is no longer smeared with ink.
Load A4-sized paper into the tray.
Start copying without placing the original.
Make sure that there is no dust on the scanner glass and the
document cover.
Cleaning the paper path of ink smears
CLEANING THE SCANNER GLASS
When copies and scanned images are smeared,
the scanner glass needs to be cleaned.
Open the
document cover. 1.
Use a soft, clean and
dry cloth to clean
the scanner glass.
2.
Ÿ Do not press the glass surface too hard while cleaning.
Ÿ Avoid scratching or damaging the glass surface. A damaged glass surface
can affect the scan quality.
NOTE:
Ÿ If the glass surface is stained with grease or some other sticky material, use
only a small amount of the cleaning solution and a soft cloth to remove it.
Wipe away the remaining liquid.
MAINTAINING THE PRINTER REMOVING JAMMED PAPER
Check the error displayed on the control panel and
follow the instructions to remove the jammed paper
including any torn pieces. After that, clear the error.
Ÿ When removing the jammed paper, avoid tilting the printer, placing it
vertically or turning it upside down. These can cause the ink to leak.
NOTE:
Ÿ Remove the jammed paper carefully. Removing the paper vigorously may
damage the printer.
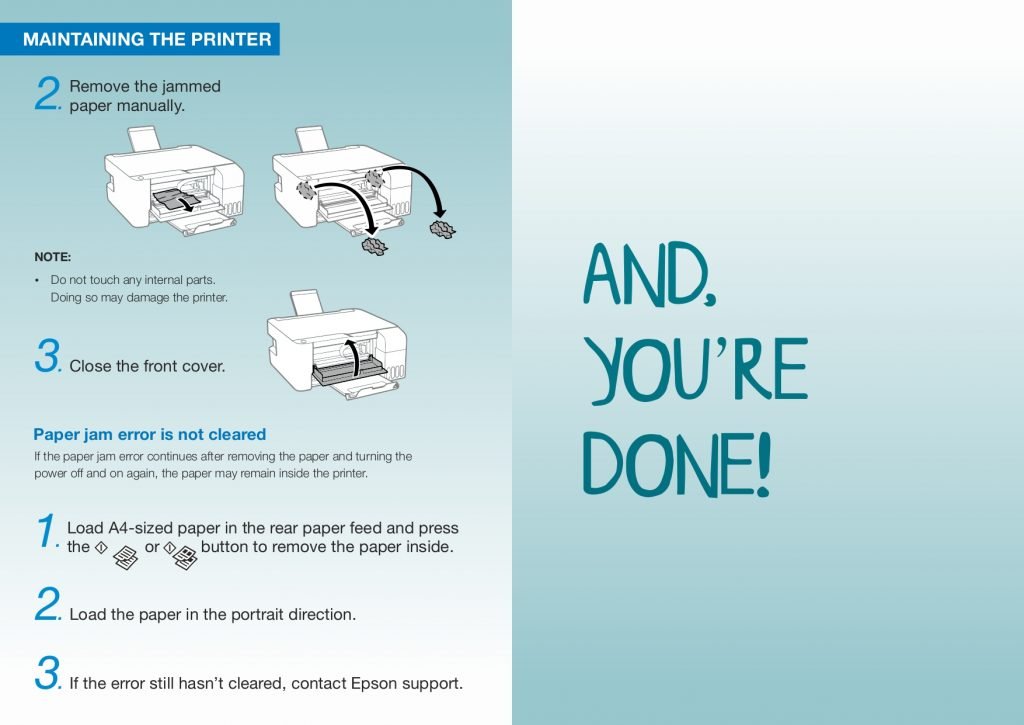
Remove the jammed paper manually.
Removing jammed paper from the rear feed
Removing jammed paper from inside the printer
Open the front cover. 1.
Ÿ Do not touch any internal parts.
Doing so may damage the printer.
NOTE:
If the paper jam error continues after removing the paper and turning the
power off and on again, the paper may remain inside the printer.
Paper jam error is not cleared
Remove the jammed
paper manually. 2.
Close the front cover. 3.
Load A4-sized paper in the rear paper feed and press
the or button to remove the paper inside. 1.
Load the paper in the portrait direction. 2.
If the error still hasn’t cleared, contact Epson support. 3.
MAINTAINING THE PRINTER
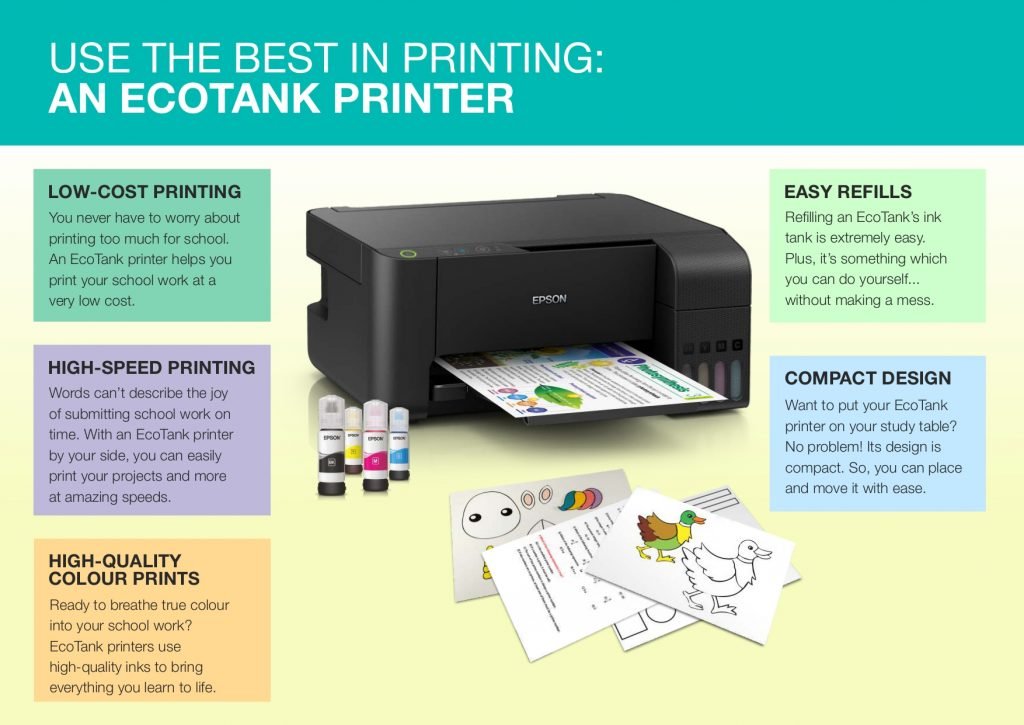
USE THE BEST IN PRINTING:
AN ECOTANK PRINTER
LOW-COST PRINTING
You never have to worry about
printing too much for school.
An EcoTank printer helps you
print your school work at a
very low cost.
HIGH-SPEED PRINTING
Words can’t describe the joy
of submitting school work on
time. With an EcoTank printer
by your side, you can easily
print your projects and more
at amazing speeds.
HIGH-QUALITY
COLOUR PRINTS
Ready to breathe true colour
into your school work?
EcoTank printers use
high-quality inks to bring
everything you learn to life.
EASY REFILLS
Refilling an EcoTank’s ink
tank is extremely easy.
Plus, it’s something which
you can do yourself…
without making a mess.
COMPACT DESIGN
Want to put your EcoTank
printer on your study table?
No problem! Its design is
compact. So, you can place
and move it with ease.
DESIGNED TO HELP YOU
ACE YOUR SCHOOL WORK
*
AMAZING COLOURS
Bring everything
you learn to life.
WIRELESS PRINTING
Print from any room
using a phone/tablet/laptop.
EPSON’S HEAT-FREE TECHNOLOGY
Low power consumption that
saves energy and money.


Leave a Reply